

Wednesday, February 15, 2012
Saturday, February 4, 2012
Home addition: ashleyg
I can't tell you via blog how excited I am to have checked my mail yesterday and see that my ashleyg postcards arrived! I ordered these off etsy not even a week ago. That night (last night to be exact) I ran to Ikea to buy some frames, framed them this morning and this is the end result. Couldn't be happier. So cheerful, colorful, yet simple. And well for 15 bucks there is no going wrong in this situation. I recommend you all get off this blog right NOW and go buy some of your own. It'll make you a better person ;-)


Sunday, January 29, 2012
Painting Chevron.
Have you ever had a project that seems like you may have bit off more than you can chew? For the past month I have been painting chevron stripes down our hallway. It didn't take a month to paint the stripes down the hall. What took a month was, buying the paint, gaining motivation to actually paint, not being afraid to paint, etc.


There was a lot of video "how-to's" for this situation. Let me share what I've learned with you.
1. Pick your colors. I picked two to start. Two isn't what I ended up with, we ended up with three because the two I picked were too similar that you couldn't tell a difference, I got so mad that the next day I threw a thrid complimentary color in there.
2. After you pick your colors, I suggest watching this video. This video made all the difference, prior to this I had NO clue what I was doing and using a stencil just seemed like extra work.
In the video they suggest using 10" spacing, I used 12" because I didn't want it to seem too zig-zaggy, if that's a word. I suppose you could use many variations on this.
3. Once you have all your points marked start here comes the taping! My word of advice would be once you start taping don't stop! I stopped several times and had trouble every time I came back trying to figure out where I left off and what went to where.

4. When cutting the tape use a sharp blade. A dull blade won't cut through the tape and you end up with rough edges. You can free hand cut like I did, or use a straight edge. If you're going to use a straight edge, metal is best so you're not cutting through your straight edge.
5. Press the edges of your tape with your finger. Using something other than you finger doesn't work as well because it won't get down into the grooves. Not doing this you'll run the risk of having your paint get underneath your tape. I pressed down my tape twice, once when I first put the tape down and again right before I was going to paint that area to ensure that tape wasn't coming up.
5. Press the edges of your tape with your finger. Using something other than you finger doesn't work as well because it won't get down into the grooves. Not doing this you'll run the risk of having your paint get underneath your tape. I pressed down my tape twice, once when I first put the tape down and again right before I was going to paint that area to ensure that tape wasn't coming up.

6. START to paint. I used this blog to help me. However, I found some of the directions rather confusing. The most helpful part was to use a foam brush to paint the edges of the tape before rolling over it.

7. Once you'd gone over your edges, it's time to bust out the roller! For each section I did two coats of paint. It would be awful to spend all this time, peal off the tape and find that you missed spots!
8. Here comes the fun part! Start to peal. Once you paint has dried start pealing away the tape. This is the tricky part, if you wait too long the tape will take the paint with it, if you don't wait long enough some of the paint can seep underneath it. I waited until the paint was dry to the touch, about 30 mins.

7. Touch up any areas you may have missed, or gotten out of the lines. Luckily by using that little sponge brush I didn't have too many area I had to go back over.
And that's it. Stand back and see the masterpiece you've created on your wall!

Thursday, January 26, 2012
Jim Flora
On a wonderful day of thrifting with my good friend, we ran across an old record illustrated by Jim Flora for a mere buck! But the worst part, neither of us bought it. What were we thinking? Well, the record was in bad shape but that's not the point! The cover was in perfect condition and ready for framing. Next week we'll go back and see if it's still there. If it is, it was meant to be.

So who is Jim Flora you may be asking yourself; he was popular in the 1940s and 1950s for his album cover art for RCA Victor and Columbia Records. If that isn't impressive enough, he wrote and illustrated 17 children's books. I am in complete awe and lust over his work: simple, bold and beautiful. If you're lucky enough to run across one of his gems snag it up and don't think twice. However, if you aren't you can purchase a silk screen or giclée print off of his website at a very reasonable price starting at $25 plus shipping.
Below are some of my favorites.
Oh, did I mention he's from Ohio? That might just be the best part.

So who is Jim Flora you may be asking yourself; he was popular in the 1940s and 1950s for his album cover art for RCA Victor and Columbia Records. If that isn't impressive enough, he wrote and illustrated 17 children's books. I am in complete awe and lust over his work: simple, bold and beautiful. If you're lucky enough to run across one of his gems snag it up and don't think twice. However, if you aren't you can purchase a silk screen or giclée print off of his website at a very reasonable price starting at $25 plus shipping.
Below are some of my favorites.
 |
| Mambo for cats. 1955 album cover. |
 |
| Louis Armstrong's hot 5. 1947 album cover. |
 |
| Ferris wheel fireworks. From "The Day the Cow Sneezed." 1957 book illustration. |
Oh, did I mention he's from Ohio? That might just be the best part.
Wednesday, January 18, 2012
Best of Instagram: December
Well it's been over a month now since I created my tumblr and believe it or not I've actually kept up with it everyday. I know for most people this seems rather easy, but for me it's not...at all. So in order to celebrate my great achievement I thought I would make a "best of" post for each month. At first I thought I'd pick my favorites, but why not let you--as in social media you, be the judge. Below are the five most "liked/reblogged" posts of the month. For the first half I didn't know you'd needed tag lines in order for people to find your posts so it took a while for people to catch on, oops. Thanks for looking and hopefully in a year I'll be able to print off the best-of's and make one of these cool displays out of them.
Look forward to an amazing DIY this weekend!
 | |||||
| This was taken at an antique mall near my in-laws during Christmas break. I love going there with my mother-in-law when we visit for a change of pace from watching football. |
 |
| This was also taken during Christmas break near my in-laws in Findlay, Ohio. It's nice since we live in the city to be able to escape to a more country atmosphere. |
 |
| Carrot cake. YUM! My husband asked for this for his 29th. birthday. At first I tried to decorate the top with cute snow flakes, it was a hot mess. So to cover up my mistake I added crushed pecans and mini-white chocolates. A yummy cover-up if I might say so myself. |
 | |
| This was after my husband and I stuffed our faces with huge burritos at the Comet. A wonderful Cincinnati staple with good food and a wonderful beer selection. |
 | ||
| This is one of the first instagrams I ever took. It was taken during a weekend getaway to Indianapolis. My husband, though a rather hip graphic designer, has a huge soft spot for racing so stopping at the Indy Motor Speedway Museum was a must. |
Look forward to an amazing DIY this weekend!
Monday, January 2, 2012
Displaying your instagrams.

Resources to print:
1. PostalPix allows you print your pictures from your iPhone for 21 cents to 21 dollars. The pictures will then be mailed to your house--get it, PostalPix? ha. So you have NO need to even leave your couch. Well I guess to get them out of the mailbox.
2. StickGram turns your images into magnets. All you do is sign in using your instagram, upload your images and boom they're now on your fridge! You get 9 magnets for 14.99 and the bonus is there is NO shipping cost.
3. Blurb is for those of you that like to make books of with your photos. This one isn't really my cup of tea as I like my memories out for the world to see. However, I think this would be nice to use to create wedding albums and such. The prices range depending on amount, size, etc.
4. Printstagram is one of my favorites! They have so many options from posters to adorable mini books. Price points range on what project you want to create. Order online have them shipped to your house.
5. Postagram sends a postcard to your friends and family via your iPhone. So can send love from your Hawaiian getaway!
6. Teeny tile creates adorable little tiles out of your instagrams for $3.99 a tile. How great would it be to see an entire bathroom wall covered in these? Too expensive? That's what I thought too.
Last but not least...
7. Casetagram turns your pictures into an iPod case. This would make for a cool present for a special someone. Each case is $34.95 with free shipping.
Display your instagrams:
1. A grid. Easy, to the point and well structured. Sounds like a win-win...win!

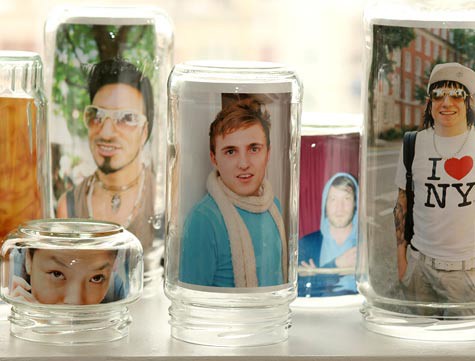
2. Picture jars. These have a lovely shabby chic feel to them.
3. Farmer's market basket from Anthro. I fell in love with this tiny basket after recently buying one for my new years resolution--that's for another post.

4. Artful framing. I know this one shows polaroids instead of instagrams, but we can substitute and I no one will know the difference.


6. Online.Tumblr is a great resource to display your images online and share them with the rest of the world!
And after you are all done be sure to reward yourself with one of these! Happy graming.

Subscribe to:
Posts (Atom)